Don't you just love when fall arrives? You get those beautiful changing leaves, cool crisp air, scarves become the favorite accessory and my personal favorite, fall produce! I crave pumpkin pie all year round and when fall finally arrives, I try not to gorge myself haha. I wanna refresh or maybe teach those who don't know about fall produce. It's really simple and it will cost you a lot less to buy these produce items while they are in season. Let's get started.
Buying seasonally is not only helpful to your wallet, but great for your body. You are buying produce that thrives in that type of weather and receiving great nutrients in return! Seasonal produce is cheaper to purchase because there is an abundance of certain crops at that time of year. For example, we all associate fall with pumpkins, squashes and apples right? We don't exactly eat juicy peaches and citrus now do we? No.... lol. Just because our grocery stores carry citrus all year round, doesn't mean we should buy it.
Our society has become one of convenience and we are able to buy these produce out of season. What we would normally be growing ourselves last season, we are now importing from other countries and paying a great deal for them.Without a second thought, people will buy a bag of oranges and pay like 8 bucks for them. Get home, and realize that your oranges are full of pith and hardly any orange and have no flavor. I hear a lot of this too," My son's soccer team likes oranges before and after practice." I can't exactly argue that one, but what's wrong with giving them their own pint of berries or a juicy plum? We need to demand that our grocery stores stock up on seasonal produce! Grown either locally or in the United States! But that's another blog lol.
Back to what I was saying before. Not a lot of people know more than a few fall produce. Things to look out for are: Blackberries, figs, apples including the honey crisp apples (Sooo amazing, please go try some if you haven't already. Their very seasonal, like 2 months out of the year), pomegranates, pomelos, plums, pears, grapes, persimmons and a probably a lot more depending on where you live lol. That's just the fruit!!
Vegetables include potatoes, leeks, onions, carrots, cauliflower, squashes, sweet corn, peppers, parsnips, fennel, cucumbers, broccoli, eggplant, the list goes on and on. I work at a grocery store and it is no coincidence that people are buying these produce! They are buying them in large quantities too, especially the fruits. The fall produce are those that have a great robustness and hearty feel. They are our comfort foods against the cold weather. Even the small berries, they are big and bursting with flavor!
Soups are one of those simple and very versatile meals to make. Not only can you make up recipes for soup, but you can add what ever you want to them! They freeze great and can be enjoyed year round! Add any vegetables you wish, you really can't go wrong!
Go online and find more about seasonal produce that's available in the fall. Also, if your city or town have fresh markets, I greatly encourage you to go to one! Farmers are more than happy to share how they grow their crops and how to get the most nutrients out of their produce. Produce bought from a market are going to cost you much less than paying for it at a grocery store, I guarantee it! Even organic produce! Farmers take great pride in organic produce, as they should.
Did you know that: It takes a minimum of 7 years for a farmers land to even become ready to start growing organically! They have to get their soil approved by the government before they can grow any crops, and have to get it tested every few months or once a year? So if you ever wonder why organics are a little more expensive, there ya go!
Anyway, please take my advice and buy seasonal produce. I have listed a few of the available fruits and vegetables that are really thriving right now. If you are an avid grocery shopper like I am, you will notice a great difference in price for what's in, and what's out of season. Just see the prices for yourself! If you like enjoying produce out of it's season, by all means by frozen produce. They are much better than canned. If you really enjoy foods like that, try making your own preserves or canned foods. You will reap the benefits of buying seasonally again and then enjoying the literal fruits of your labor.
Have a wonderful fall season, stay warm!
Tuesday, November 1, 2011
Saturday, October 1, 2011
Produce Blog
I am so sick of seeing things on t.v. about trying to hide foods with kids. Things like Mott's Apple Juice that has hidden vegetable juices, or WhoNu cookies that supposedly have added vitamins. Another one is Chef Boyardee with hidden vegetables in the meat sauce. LOL the packaging on the front has the word vegetables, like the kids aren't going to see it! Why do parents feel the need to hide these wonderful foods from their kids?
Kids palates change all the time, so constant exposure and introduction to foods is a must. If a kid doesn't like the taste of boiled broccoli, serve it to them steamed with garlic and a little butter. It's not hard! Any parent with access to television or the internet, have no excuse about not being able to find a way to prepare certain foods to their kids. People dedicate cook books and blogs to cater towards kids too for crying out loud.
Produce is so essential to a kids health, they literally need great food to grow! Why would you feed kids cookies that have been manufactured with Vitamin D and C, and looks just like an Oreo? They will grow up thinking that all cookies are healthy and develop a bad diet into their adulthood. Those cookies contain negative calories and are a health lie. Either eat them in moderation or don't eat them at all.
You can take supplements and shove vitamin gummies down your kids throats, but what they really need is a hearty diet. There are vital nutrients in vegetables and fruits that you can't get in the pill form. You can concentrate vitamin C all you want, but you will get more benefits from eating an actual orange. There are special enzymes inside fruits and vegetables that aid in digestion and repair your body, that are just non-existent in pills.
When I have kids, I want to take them to local markets that open up around my town and inform them of what they are eating. They should know where their food comes from! Kids are so impressionable, for all they know produce comes from the store when it really comes from a farm that's only 50 miles away! Having kids harvest produce themselves, I think it makes the best impression of all. They see how the foods are being grown, how much effort and time it takes to grow them, and have a better appreciation for what they get served at home.
Local farmers from neighboring cities come together at beautiful markets to provide colorful and vibrant produce to people who have a great appreciation for food. Any child would be amazed to know that not all watermelons are red, some are yellow! Also, bell peppers aren't just red, they are also orange, green and yellow!
Take a little time to show your kids or go on a field trip to a farm or local market. Let them see how these foods are grown and the people who grow them! Heck take them to your local grocery store and introduce them to produce. You know how cool a leek or a pineapple would look to a kid? Here's some pics just to show you:

Leek

Pineapple
Jamie Oliver made an attempt to go across America and teach elementary students about healthier foods, but I don't feel like it made much of a difference. I give him mad props for trying, but our nation is in dire need of a radical food change. Kids don't realize that chicken nuggets are ground with preservatives and deep fried and just warmed through and served at their school. I would much rather be served an actual piece of chicken like a leg or thigh that has been baked.
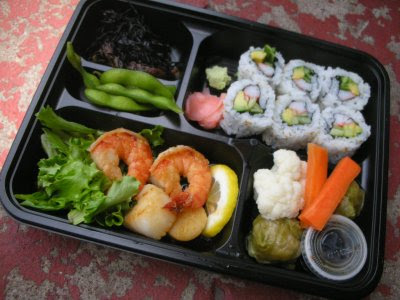 Did you know that in Japan, kids eat their lunches in what they call "Bento Boxes"? Inside them are a wide variety of foods such as rice, tomatoes, cucumbers, pumpkin etc. They are beautifully decorated and make eating them so much fun! These kids are encouraged to eat up to 20 different foods in a day and up to 100 different foods a week, crazy right? It's a big change from the boring pizza or spaghetti night. That could be you or your family!
Here's something to make that a reality! If you shop seasonally, not only will you eat a wider variety of foods, you will also spend less on produce. A lot of grocery stores will stock produce in their stores outside of their normal seasons in order to meet customer demands. It's nice to eat summer citrus in winter but we really need to demand seasonal produce. You can pay 4 times more for out of season produce than produce that is in season. To me it's just common sense! If you really want out of season produce splurge on the frozen stuff like berries, those are much more reasonably priced.
There are tons of websites online that tell you what produce are available and at what time so I won't bore you with that lol. But here are a few produce that I feel are commonly associated with particular seasons:

-Apples are associated with the fall, along with pumpkins and a variety of squashes.

-Citrus fruits like oranges and lemons are summer time produce.

-Asparagus and strawberries are tender spring produce.
Just listing off those few produce makes me excited I just love fruits and vegetables so much! LOL I was that weird kid growing up who ate her broccoli and spinach. I feel so blessed to have been fed those foods despite the fact that my mom didn't like them. She knew that those foods were beneficial for my health and my sister's health.
Take this blog to heart and consider opening up your child/children to produce. Don't try and hide foods from them either because it will turn against you some day. If kids wonder why their favorite spaghetti sauce tastes so good and you tell them that it has onions in it, how are they going to react? Especially if they won't eat onions when they are visible in other foods. Take them on a field trip to a farm or local produce market and teach them about produce! When kids get hands on experience, they will carry that knowledge with them throughout life.
I would love to read comments about kids having great experiences with fruits and vegetables! Thank you for reading. :)
Kids palates change all the time, so constant exposure and introduction to foods is a must. If a kid doesn't like the taste of boiled broccoli, serve it to them steamed with garlic and a little butter. It's not hard! Any parent with access to television or the internet, have no excuse about not being able to find a way to prepare certain foods to their kids. People dedicate cook books and blogs to cater towards kids too for crying out loud.
Produce is so essential to a kids health, they literally need great food to grow! Why would you feed kids cookies that have been manufactured with Vitamin D and C, and looks just like an Oreo? They will grow up thinking that all cookies are healthy and develop a bad diet into their adulthood. Those cookies contain negative calories and are a health lie. Either eat them in moderation or don't eat them at all.
You can take supplements and shove vitamin gummies down your kids throats, but what they really need is a hearty diet. There are vital nutrients in vegetables and fruits that you can't get in the pill form. You can concentrate vitamin C all you want, but you will get more benefits from eating an actual orange. There are special enzymes inside fruits and vegetables that aid in digestion and repair your body, that are just non-existent in pills.
When I have kids, I want to take them to local markets that open up around my town and inform them of what they are eating. They should know where their food comes from! Kids are so impressionable, for all they know produce comes from the store when it really comes from a farm that's only 50 miles away! Having kids harvest produce themselves, I think it makes the best impression of all. They see how the foods are being grown, how much effort and time it takes to grow them, and have a better appreciation for what they get served at home.
Local farmers from neighboring cities come together at beautiful markets to provide colorful and vibrant produce to people who have a great appreciation for food. Any child would be amazed to know that not all watermelons are red, some are yellow! Also, bell peppers aren't just red, they are also orange, green and yellow!
Take a little time to show your kids or go on a field trip to a farm or local market. Let them see how these foods are grown and the people who grow them! Heck take them to your local grocery store and introduce them to produce. You know how cool a leek or a pineapple would look to a kid? Here's some pics just to show you:

Leek

Pineapple
Jamie Oliver made an attempt to go across America and teach elementary students about healthier foods, but I don't feel like it made much of a difference. I give him mad props for trying, but our nation is in dire need of a radical food change. Kids don't realize that chicken nuggets are ground with preservatives and deep fried and just warmed through and served at their school. I would much rather be served an actual piece of chicken like a leg or thigh that has been baked.
 Did you know that in Japan, kids eat their lunches in what they call "Bento Boxes"? Inside them are a wide variety of foods such as rice, tomatoes, cucumbers, pumpkin etc. They are beautifully decorated and make eating them so much fun! These kids are encouraged to eat up to 20 different foods in a day and up to 100 different foods a week, crazy right? It's a big change from the boring pizza or spaghetti night. That could be you or your family!
 Here's something to make that a reality! If you shop seasonally, not only will you eat a wider variety of foods, you will also spend less on produce. A lot of grocery stores will stock produce in their stores outside of their normal seasons in order to meet customer demands. It's nice to eat summer citrus in winter but we really need to demand seasonal produce. You can pay 4 times more for out of season produce than produce that is in season. To me it's just common sense! If you really want out of season produce splurge on the frozen stuff like berries, those are much more reasonably priced.
There are tons of websites online that tell you what produce are available and at what time so I won't bore you with that lol. But here are a few produce that I feel are commonly associated with particular seasons:

-Apples are associated with the fall, along with pumpkins and a variety of squashes.

-Citrus fruits like oranges and lemons are summer time produce.

-Asparagus and strawberries are tender spring produce.
Just listing off those few produce makes me excited I just love fruits and vegetables so much! LOL I was that weird kid growing up who ate her broccoli and spinach. I feel so blessed to have been fed those foods despite the fact that my mom didn't like them. She knew that those foods were beneficial for my health and my sister's health.
Take this blog to heart and consider opening up your child/children to produce. Don't try and hide foods from them either because it will turn against you some day. If kids wonder why their favorite spaghetti sauce tastes so good and you tell them that it has onions in it, how are they going to react? Especially if they won't eat onions when they are visible in other foods. Take them on a field trip to a farm or local produce market and teach them about produce! When kids get hands on experience, they will carry that knowledge with them throughout life.
I would love to read comments about kids having great experiences with fruits and vegetables! Thank you for reading. :)
Tuesday, August 2, 2011
What is American Cuisine?
When I first started Culinary School, one of my Chef instructors asked his students to answer a questions as best we could. We would share our answers after writing down what we thought. The question he asked us was, "What is American Cuisine?" Or rather yet, "What makes up American Cuisine?"
A lot of us were stumped as to what we could come up with. The first thing I thought of were hot dogs and hamburgers, but those are German. Then I thought, macaroni and cheese, but pasta was first Chinese and then Italian. Then I thought, Apple Pie, but apples come from China and pastry from France. So.... what makes up American Cuisine? It's quite difficult to define our own cuisine because our country was founded by immigrants, who brought food from their native lands.
It's something to be debated because there are probably a good amount of foods that were created in America but aren't anything special enough to be defined as an "American food". To me, American cuisine is regional. You have the New England area which is full of great seafood dishes, you have the Bread Basket which is rich and hearty food, the south is rich in soul food, and the west coast is seasonal/fresh to south of the border. It is such a wide variety, that if I were a foreigner, I would be kind of confused as to what a typical American meal was comprised of. Sure we have Italian restaurants, and Sushi bars, but they are not American Cuisine.
In my honest opinion, America has no cuisine. We are the Melting Pot Nation, and a young one at that. We haven't been around nearly as long as others, but that's what great. We are still growing strong as a country and we are coming closer to defining what we would call American Cuisine.
I love that when you travel though, you can rely on other cultures having certain foods. They may vary slightly from region to region, but they are essentially the same dish. Chinese, Japanese, and Korean Cuisines are hundreds and hundreds of years old. Their people have been keeping the same dishes alive today that were being served hundreds of years ago. They are age old recipes and have remained staples of these countries and can be recognized world wide. How wonderful a dish must be that draws one in, in hopes to become that much closer to their culture. I know it draws me in, I am simply intrigued in other cultures cuisines.
What also amazes me is how ancient travel has had a great influence on cuisine. When one country set out to explore new land, they took home new ingredients and recreated a dish they liked and made it their own. They might be very similar but have subtle differences with what's available in that area.
But I digress...If I absolutely had to define American Cuisine, I would say: It's one of comfort and relative ease. We are a fast paced people and we need food that can deliver. Not necessarily fast food, but food that's fast. Get what I am saying? It's not everyday that you see a mom cooking duck confit for a family of 5 or a man cooking a pig under ground but I am sure that people have done it lol. For a normal blue collar family, they want to spend as much time together as possible. A quick cooked meal such as spaghetti and garlic bread or meatloaf and steamed vegetables are a great way to go.
I often refer back to that question my Chef asked me, what is American Cuisine? It is a constant inspiration to me and remains a perplexing question. Anyway, thanks so much for reading!
P.S. If anyone would like to debate and have a say as to what they think American Cuisine really is, please let me know! I would love to hear any input! Thanks!
Wednesday, July 13, 2011
Mother Sauces: Espagnole (Brown Sauce)
This sauce is so wonderful! It has such a deep, rich flavor thanks to the variety of ingredients that go in it. This is the 3rd installment of the 5 Mother Sauces blog. This sauce compliments beef fantastically and freezes well to use later on.
This recipe yields 1 gallon.
You will need:
Ingredients
Mirepoix, med. dice** 2 lbs.
Clarified Butter 8 fl. oz.
Flour 8 oz.
Brown Stock** 5 qts. (20 cups.)
Tomato Puree 8 oz.
Sachet**
1 Bay Leaf
Dried Thyme 1/2 tsp.
Crushed Peppercorns 1/4 tsp.
Parsley Stems 8
Salt and Pepper TT
Directions
1.) In a large stock pot, heat the clarified butter over medium-high heat. Add in the mirepoix and caramelize on all sides.
2.) Add in the flour and make a brown roux.** Whisk often so flour will not burn.
3.) Once you've made a brown roux, pour in the brown stock and tomato puree. Whisk again to break up lumps. Bring to a boil uncovered and reduce to a simmer.
4.) Add in the sachet, and simmer for approx. 1&1/2 hours. This will allow the sauce to thicken. Skim the surface if any impurities form at the top.
5.) After the allotted time, strain the sauce through a fine mesh sieve or cheesecloth if you have it. Adjust the seasonings as you like it with salt and pepper and use immediately. Or cool and freeze for later use.
***Cook's Notes:
1.) Mirepoix: (Meer-uh-pwah) This is a mixture of 50 % onions, 25% carrots and 25% celery. This recipe called for 2 lbs of it so you would use 1 lb. onions, 1/2 lb. of carrots and 1/2 lb. of celery. This is used as the base to a lot of great soups, sauces including the wonderful bolognese. Typically they are discarded because all of their flavor will have been incorporated into what ever they are used in.
2.) Brown Stock: Brown stock is made from roasting beef bones, vegetables and tomato puree and then simmered for hours. Save yourself some time by buying low sodium beef broth or brown stock from a health food store.
3.) Sachet (Saa-shay) This little bundle of joy is what gives many stocks and sauces deep flavor. The spices are wrapped in cheese cloth (using 2 coffee filters works great too) and tied off with butchers twine. I almost always use 1 clove of smashed garlic because I LOVE garlic haha.
I really hope you enjoy this recipe. Please feel free to scale down this recipe to the size you want. I prefer to blog these recipes in large amounts because they freeze really well. Plus you can thaw it out at a moments notice and people will think you spent all day making it!
Wednesday, July 6, 2011
Mother Sauces: Veloute
This blog will be covering the second sauce in the 5 Mother Sauces, known as a Veloute (Veh-loo-tay). This sauce is very similar to the bechamel but instead of using milk, you use chicken/veal/fish stock. Oh and no piquet lol. Veloute's are great in pasta dishes, makes a fabulous sauce for chicken pot pie, and can be added to soup. Here's how to make it:
WARNING: This recipe yields 1 gallon. Feel free to reduce to your liking.
Ingredients
Clarified Butter 8 fl. oz.
Flour 8 oz.
Chicken stock 5 qts. (4 cups in quart, so use 20 cups)
Salt TT
White Pepper TT
1.) In a large stock pot, add in the chicken/veal/fish stock. Turn heat on to medium-medium high and get the stock hot.
2.) In another pot heat the clarified butter over medium-high heat. Once it's hot add in the flour. Whisk constantly. Make a white roux.
3.) Gradually add the hot stock to the roux while whisking constantly preventing any lumps. Bring to a boil and then reduce to a simmer. Whisk often to reduce the sauce from burning.
4.) At this point, season to your taste. I would suggest you under season it because the sauce will thicken and reduce over time.
5.) Strain through a fine mesh strainer or cheese cloth. Use immediately or chill in a bowl over ice water. Place plastic wrap on the sauces surface to prevent a skin forming.
I realize that this sauce is a rather large quantity but it's just easier for me. I am reading these recipes from my cooking book I used in school. I will do a blog later on, on how to increase and decrease recipes to the amount you need.
P.S: Since Veloute is so similar to bechamel, I didn't think a picture was necessary. They are really quite similar in color.
Thank You!
Mother Sauce: Bechamel
This blog is going to be about "Mother Sauces". Mother sauces bring that touch of elegance to a dish that makes us crave eating away from home. Not only are these sauces great at their most basic form, but they can be transformed into numerous others! They inspire us foodies to be creative with their uses, yet are there to keep the classic meals alive. I won't bore you with their origin or who created them, you can look that up on your own time lol. Although their origins are worth looking up because some recipes came about from a total accident. :D
This blog will come in 5 parts so I can cover every Mother Sauce. If you take the time to make these yourself at home, your dishes will come out fantastic! People will know that you took the time to make your meal from scratch and they will thank you for it. I feel like in today's society nobody takes time to do anything home made any more. I hope this blog inspires you to just..... slow down! Let's begin!
I am going to start with the Bechamel Sauce (Beh-shuh-mehl)
Ingredients
Whole Milk 16 oz.
Flour 2 TBSP
Clarified Butter 2 TBSP
Salt TT (to taste)
White Pepper TT
Nutmeg TT
1/2 small Onion Piquet **** (See cooks note at the bottom of the blog)
Directions:
1.) Pour the milk into a large heavy bottomed pot. Gently add in the onion piquet and simmer on medium heat for 10 minutes.
2.) In another pot add in the clarified butter. Turn on the heat to medium-high and heat butter through. Once the butter is hot, whisk in the flour. Whisk constantly until this mixture becomes pasty in appearance and nutty smelling. Don't cook too long, you want it to stay pale. This mixture is called a "Blond Roux".
3.) After the milk and piquet have simmered for 10 minutes remove the piquet. Gradually add the hot milk to the roux while whisking constantly. Try to get rid of any lumps.
4.) Once you have incorporated all of the milk into the blond roux, simmer until thickened, whisk often.
5.) Add in the salt, white pepper and nutmeg to your taste. Nutmeg is very powerful and you just want a hint of it in there.
7.) Strain the sauce through a fine mesh seive or cheesecloth if you have it. Use immediately or cool in a large bowl over ice water. Place a piece of plastic wrap on the surface to prevent a skin from forming.
This sauce is fantastic as is. You can add it to the top of a lasagna to give it that silky touch, and is the most common base for mac and cheese sauce!
I found this image on google, but it comes from http://healthyrecipes.wikia.com/wiki/B%C3%A9chamel_sauce
****Cook's Note: An onion piquet/pique is a halved onion studded with cloves and a bay leaf.
 I found this image on google but it comes from http://cornellgourmet.wordpress.com/2011/02/02/piquet/
Enjoy this sauce!
This blog will come in 5 parts so I can cover every Mother Sauce. If you take the time to make these yourself at home, your dishes will come out fantastic! People will know that you took the time to make your meal from scratch and they will thank you for it. I feel like in today's society nobody takes time to do anything home made any more. I hope this blog inspires you to just..... slow down! Let's begin!
I am going to start with the Bechamel Sauce (Beh-shuh-mehl)
Ingredients
Whole Milk 16 oz.
Flour 2 TBSP
Clarified Butter 2 TBSP
Salt TT (to taste)
White Pepper TT
Nutmeg TT
1/2 small Onion Piquet **** (See cooks note at the bottom of the blog)
Directions:
1.) Pour the milk into a large heavy bottomed pot. Gently add in the onion piquet and simmer on medium heat for 10 minutes.
2.) In another pot add in the clarified butter. Turn on the heat to medium-high and heat butter through. Once the butter is hot, whisk in the flour. Whisk constantly until this mixture becomes pasty in appearance and nutty smelling. Don't cook too long, you want it to stay pale. This mixture is called a "Blond Roux".
3.) After the milk and piquet have simmered for 10 minutes remove the piquet. Gradually add the hot milk to the roux while whisking constantly. Try to get rid of any lumps.
4.) Once you have incorporated all of the milk into the blond roux, simmer until thickened, whisk often.
5.) Add in the salt, white pepper and nutmeg to your taste. Nutmeg is very powerful and you just want a hint of it in there.
7.) Strain the sauce through a fine mesh seive or cheesecloth if you have it. Use immediately or cool in a large bowl over ice water. Place a piece of plastic wrap on the surface to prevent a skin from forming.
This sauce is fantastic as is. You can add it to the top of a lasagna to give it that silky touch, and is the most common base for mac and cheese sauce!
I found this image on google, but it comes from http://healthyrecipes.wikia.com/wiki/B%C3%A9chamel_sauce
****Cook's Note: An onion piquet/pique is a halved onion studded with cloves and a bay leaf.

Enjoy this sauce!
Wednesday, June 15, 2011
20 Kitchen Tips and Tricks
Like the title says, here are a few random tips and tricks that I would recommend to you to make your life a little easier in the kitchen:
1.) Got garlicy or oniony smelling hands? Find something that is stainless steel in your kitchen and rub your hands on it. Seriously!! Trust me. Rub your hands on your sink faucet or a spoon, you can even buy something called "Stainless Steel Soap" and the garlic smell comes right out. The stainless steel soap looks like an actual bar of soap that you pretend to lather in your hands to get the smell out. Works every time!!
http://www.amazon.com/s/ref=nb_sb_noss?url=search-alias%3Daps&field-keywords=stainless+steel+soap&x=0&y=0
2.) If you want to boil water faster try these two tips: When you are actually filling up your pot with water, start with hot water, it will boil much quicker! Also, if you have a lid that fits the pot you wish to boil in, the lid will keep in heat that is being lost as steam and will also make the water boil faster.
3.) Non stick pans: Just because a pan is non-stick, doesn't mean you shouldn't use some kind of oil to cook with. A lot of people use these pans so they can reduce the amount of cooking oil for health reasons. But under no circumstances are you to use an abrasive cleaner with these pans. To get the most life out of them, use a mild soap, very soft cloth, and clean immediately after cooking in it. Don't soak it for too long either, it wears out the tephlon.
4.) Ripening Produce: If you want any kind of fruit or vegetable to ripen, put it in a plastic/paper bag with a banana. The gas given off by the banana ripens the produce itself and will ripen anything next to it.
5.) As seen on TV: Please do not fall for every "convenient" piece of cookware you see on television. I'm talking about the slap chop or a stupid strawberry huller, you really don't need to waste your money on them. The slap chop is a waste because the food has to be cut small enough to fit inside the container, and you can just as easily hull a strawberry with a paring knife. Use common sense with what you already have at your disposal. Please do not succumb to the lazy man's way of cooking.
6.) Cutting Board: When you are using a cutting board, put a damp towel underneath it to prevent it from slipping. I have had a few close calls with a very sharp knife and I could have easily prevented it had I thought to put a towel under it. Paper towels work great on smaller cutting boards.
7.) Dull Knives: Just because a certain knife can't cut through a tomato, doesn't mean it isn't sharp on your skin. There are those dull knives in everyone's kitchen that nobody uses to cut food because they are so dull. But they are still sharp on the skin. It sounds silly but it is safer to sharpen that knife so you don't have to hack your way through your food and risk cutting a finger off. The sharper your knife is, the less work you have to do. Let the knife do the work for you.
8.) Thermometers: NEVER, EVER use a mercury filled thermometer to check the temperature of food. Not only is the mercury poisonous, but the glass surrounding it is a hazard to eat. Use a digital thermometer. They give very fast temperature readings, never need calibrating, and are super easy to clean.
9.) Measuring ingredients: Measure out ingredients in their appropriate measuring cups. Liquids are meant to be measured in fluid ounces.Pyrex measuring cups are in just about every household, they are clear with red markings. Dry ingredients you either weigh on a scale or measured in their own cup. These measuring cups are typically not clear and clearly labeled from 1/4 cup to 1 cup. Anything smaller than that gets measured with measuring spoons, like tablespoons and teaspoons.
10.) Understanding Recipe Abbreviations: For those who get confused with abbreviations in recipes, this might help you out:
-tsp. = Teaspoon. (Note: All lower cased letters used and a period at the end.)
-TBSP. = Tablespoon. (Note: All letters are upper cased. 3 tsp. = 1 TBSP just fyi. lol)
-lb. = A reference for a Pound. Like a pound of flour or a pound of beef.
-c. = Cup. I don't see this too often in recipes now a days, but I see it a lot in my families recipe box. I'm talking like, my grandma's recipes that she got from her mom!
-ct. = Count. This is used for things like lemons, or eggs. It represents how many individual items you need for a recipe. So if a recipe says Lemons 6ct. that means you need 6 lemons.
11.) NOT ALL RECIPES YOU FIND WILL TURN OUT RIGHT.
If you are looking at recipes online be sure to read a good amount of reviews to see if it's worth even cooking it. Often times people who comment on the recipe, they will change the amount of ingredients which saves other people a lot of trouble. Another thing to remember is this: there are different ways to measure out ingredients, such as pounds, ounces, and cups. I always get screwed when I measure out flour in a measuring cup. The flour can pack differently if you are measuring it straight from the bag or if you are measuring it out from a large canister sitting on your counter. If you have room to sort of fluff the flour before leveling it off you will get a better measurement of the flour versus scraping the flour off the side of the actual bag it comes in and risk increasing the flour amount. lol get it?
12.) Tiny Amounts of Ingredients: When people say add a pinch of something, a pinch usually equals out to 1/8 of a teaspoon. There is no real measurement for an 1/8th of a teaspoon, so it ends up being called a "Pinch". Practice making a pinch by pouring some salt or sugar in a bowl. Grab what you think would be an 1/8th of a teaspoon and test it out! This would mostly be used in a savory application where salt is something that is to taste. Such as soup or a sauce.
13.) Grilling technique: If you want to perfect grill marks on food, try this method: Imagine you are looking at a clock on your grill. Visualize where the 10:00 and 2:00 positions would be on the clock. Lay the food that's about to be grilled pointing towards 10:00 with one end. While the food is still on that same side, rotate it to the 2:00 position. Flip over to the other side and repeat. This will create perfect hatch marks which is desirable when grilling.
14.) Onions: Get teary eyed while cutting onions?? Yeah it's not something you can really avoid. People will tell you that if you put the onion in the freezer for a few minutes or run it through cold water, that it will decrease the pungency but those will not work. If you have a sharp knife, you will not damage the cells in the onion as much and will make for happier eyes! Also if you have a candle handy preferably a strong scented one, it can help distract your nose from the oniony fume. lol so light that sucker up! I have seen some people go as far as having a pair of "Onion Goggles" so the fumes won't reach their eyes. LOL
15.) Pasta Trouble: Ever find a clump of spaghetti noodles stuck together after you boiled them? They stuck together thanks to the starch and lack of room to boil. When you are boiling pasta you need to use the largest pot you have or just a big pot in general. Each pasta strand should have room to "swim" in the boiling water so they won't stick together. Stir the pasta throughout it's cooking time to agitate the starch in the water. Oil doesn't help because water and oil don't mix and it just floats to the top. So give your pasta plenty of room to cook in a large pot.
16.) Dried Herbs: Dried herbs DO NOT last you a life time. Believe it or not, there are essential oils stored in dried herbs that help give them that extra oomph that fresh herbs sometimes can't give you. Dried herbs are to be used cautiously because their flavor is more concentrated. If you know that you aren't going to be using dried herbs all that often, buy the smallest container possible, or don't buy them at all. They are 3 times more potent than fresh and are best kept in a cool dark environment, I.E. your pantry.
17.) Cooking Oil: Be cautious when using oils in your kitchen. Olive oil has a very low smoke point meaning that the oil will begin to smoke and break down at a certain temperature. A better substitute would be vegetable oil or peanut oil. Also, olive oil has a very distinct flavor and is often used in uncooked applications, so use it sparingly. Grape seed oil and Canola Oil are great because they are flavorless and have high smoke points. These can be used to simply sautee or even deep fry. There are oil blends out there, but just read the labels to be sure you are using the correct oil for the correct application.
18.) Thawing Meat: The best way to thaw meat at home, is to do so in your refrigerator. We do not always plan our meals but if you can, please thaw meat this way. Leave the meat in it's original container, place it on a plate, and put it in the lowest part of your refrigerator. Allow it to thaw overnight or for a few hours until completely thawed. The plate catches any water or juices the meat might give off. If you thaw meat at room temperature outside the fridge, bacteria will grow on the surface of the meat and can get you very sick. This bacteria cannot be cooked out either.
19.) Veggie Nutrition: If you want to get the most nutrition out of your vegetables, keep them as close to raw as you can. By that I mean eat them raw or cook them minimally. Steaming vegetables instead of boiling retains much more nutrients. Quick sauteing is also another great method, you are still retaining a slight crunch and most of the nutrients! By the way, vegetables do NOT have to be boring in flavor. Example: Core and remove the white pithy parts of a few red bell peppers. Slice them thin, add them in a large bowl, add a tiny splash of olive oil, lemon juice, salt, pepper and cumin and toss to combine. This makes a great antipasto side dish or salad topper.
20.) Fridge storage and spoilage: If you want to get the most out of your food in the refrigerator follow these tips:
If you can help it, don't allow items in your fridge to touch because that cold air won't circulate between them.
Store your milk in the back of the fridge to get the most life out of it. Keep the humidity in the produce drawers to a reasonable level.
If you need to cool anything down in the fridge, put it on the top shelf. The residual heat can damage other foods if the hot foods are placed below already chilled foods.
My list could literally go on and on but I must stop here. I hope some of these tips were helpful to you. They are pretty random but I have had these tips stuck in my head all day and had to get them out. Have a wonderful day!!
Tuesday, May 24, 2011
Linzer Tart Recipe
This recipe is so easy and great for entertaining. This recipe has a few parts to it so stay tuned for the recipe attachments (See ingredients for what I am talking about)!! This version of the linzer tart gives you a great way to add some pizazz to this dessert with a lemon curd and meringue topper! ***Please note that this recipe requires a scale to measure ingredients.
LinzerTart
Yield : 8 – 10 servings (1 Large linzer)
Ingredients: Crust
Unsalted butter 8 oz.
Granulated Sugar 8 oz.
Egg yolks 2 yolks
Orange zest, grated fine 2 TBSP.
Lemon zest, grated fine 1 TBSP.
All Purpose Flour 11 oz.
Hazelnuts, ground fine 6 oz.
Baking Powder 1 tsp.
Cinnamon, ground 2 tsp.
Cloves, ground ½ tsp.
Salt ½ tsp.
Other Ingredients
Raspberry preserves 14 oz.
Lemon Curd (Jar or home made)
Meringue (See recipe in blog list)
Fresh Raspberries for garnish
Directions for Crust:
1.)In a standing mixer (use the paddle attachment here) or hand held mixer, cream together the butter and sugar until light and fluffy. Add in the egg yolks and zests, beat until well combined. Scrape down the bowl with a spatula and prepare other ingredients.
2.)In another bowl whisk together the flour, ground hazelnuts, baking powder, cinnamon, cloves and salt. Add this dry mixture to the wet ingredients, mix until just combined. (This dough may look more like cookie dough than pastry crust.) Roll out slightly and wrap in plastic wrap and chill for 1 hour in the fridge.
3.)After the dough has chilled, bring out of the fridge. Flour a cutting board generously and cut the dough in half. Briefly knead each half by hand and then flatten out by hand. Gently roll out the dough into ¼ in. thickness and use it to line a 9in. or 10in. tart pan with a removable bottom .(you can use a pie pan also, you just have to keep it in the pie pan after baking.) This rich dough patches easily so any cracks or holes can easily be concealed with any crust that hangs over the edge.
4.) Once the dough is in the pan, chill for 10 minutes in the fridge.
5.)At this point you will want to preheat your oven to 350°F.
6.)You can use the other half of the dough to make a lattice pattern to top the tart or you can save it for the bottom of another tart. This recipe uses just half of the dough for the bottom and a meringue as a topper.
7.)Remove the dough from the fridge and bake until slightly golden or for 20-25 minutes.
8.)Allow the tart crust to cool. Once cooled, add on the raspberry preserve, lemon curd and then the meringue. You can pipe the meringue to create a soft pillow looking top, or use the back of a spoon and make curled peaks. Place the tart in a broiler and allow the meringue to brown slightly. Or if you have a blow torch, have at it haha!
This recipe is bumped up a notch in flavor with the lemon curd and meringue but it’s completely up to you if you want to leave it plain with just the raspberry preserves. The dough itself is very flavorful so don’t worry about it lacking in flavor with just the preserves. If you have mini tart pans also, this recipe works great if you want to make individual portions. Here are some pictures of the linzer tart making process:
Linzer Crust with Raspberry Preserve on the bottom

Linzer tart with addition of Lemon Curd and beginning to top with meringue

Cooled Linzer Tart topped with Lemon Curd and then piped meringue. Additional garnishes include edible food gel and fresh raspberries. Meringue is also lightly browned with a torch.

These are miniature tarts with hearts cut out. Simply just two layers of crust and a thicker amount of raspberry filling.


Here is a closer look at the larger tart.

I really hope you enjoy this recipe, this is such a great summer dessert and looks fabulous on a nice display platter if you have one. Thank You!!
Friday, May 20, 2011
411 on Hors d' Oeuvres
This blog is going to talk about “Hors d’ Oeuvres” (Orr-durves). Some people might think that these little 2 bite concoctions are for the fancy type and are super time consuming to make but that’s not the case at all!! You can make an array of hors d’oeuvres right at home. Hors d’oeuvres are a great way to utilize leftovers or things in your kitchen that are about to go bad. But before we go into that, let’s talk about what makes up an hors d’oeuvre.
Base: This is the most bottom part of an hors d’oeuvre. This can include anything from a slice of cheese, a cracker, bread, a cucumber or even a piece of fruit. This is the first layer to an hors d’oeuvre.
Spread: A spread can include things such as mayonnaise, butter or jam. It’s a flavor agent as well as a protector of the base. The spread is put on the base so the base won’t become soggy from the topping on the hors d’oeuvre. This is the second layer to an hors d'oeuvre.
Binder: A binder would be used if some kind of food in the hors d’oeuvres needs structure. An example would be gelatin: gelatin can be added to a mousse of some kind so that it can maintain its volume. Not only is this great for presentation, but it is also great for its texture. It’d be a shame to pick up a salmon mousse barquette and you see a tiny pool of pink goo in a soggy piece of crust.
Aerator: Beaten egg whites or heavy whipping cream are perfect examples of an aerator. These items also give volume to mousses or other food items to make for a great presentation and texture. If they are over beaten they can appear grainy. The binder/aerator would make up the middle part of the hors d'oeuvre.
Optional: Garnish: Sometimes an hors d’oeuvre can have a garnish such as caviar or fresh chopped parsley, but it really just depends on what’s being served. This would be the last part of the hors d'oeuvre.
So like I was saying earlier, hors d’oeuvres are a great way to incorporate leftovers or things that are about to go bad in your pantry! If you have some bread about to go stale, you can take a cookie cutter cut out a fun shape, toast it lightly, rub on some raw garlic, add a small slice of tomato and some cheese and basil if you have it, and BAM! You have an amazing Italian style crostini hors d’oevre. A small splash of an aged balsamic vinegar would add a nice touch to it too!
You could also thaw out some frozen shrimp, saute them with a little butter, salt, pepper and garlic and top with creme fraiche and cilantro. Serve on a butter cracker and you have heaven on a cracker!! Seriously, hors d'oeuvres are so simple and quick to make.
You could also thaw out some frozen shrimp, saute them with a little butter, salt, pepper and garlic and top with creme fraiche and cilantro. Serve on a butter cracker and you have heaven on a cracker!! Seriously, hors d'oeuvres are so simple and quick to make.
They are meant to be small because they are usually served before an appetizer or as an appetizer. You could host a party with just hors d'oeuvres if you wanted, just make sure you have a wide variety. Here are some examples of what you could make:
This one is a spin on like a cooled seafood salad: Cucumber slice as the base, citrus mayo and cocktail style shrimp.

Prosciutto and Melon on toasted bread

Gravlax, Dill Sour Cream and Hot Pepper flakes on a Cracker

Buckwheat Pancakes (Blini) with Creme Fraiche and Caviar

Toasted Bread Stars, Caramelized Shallots and Parsley Creme Fraiche

Rectangle cut white bread, tuna salad, two types of caviar and parsley garnish. ( I only used caviar in a few of these because I had them at my disposal in culinary school. You could easily use diced red and yellow bell peppers.)

Get creative with a display. We were given cool shaped Mirrors!


I really hope you enjoyed this and you can become creative in making all kinds of hors d'oeuvres!
Oh and if you are thinking that you are never going to be able to spell hors d'oeuvres, this is the way I learned. The first half is pretty simple Hors and then a single "d" with an apostrophe. But for the "o" part, just think of that song from the Wizard of Oz. The men who were guarding the witches castle near the gate that sung, "Ohhhhh weee ohhh...we ohhhhh ho." Well put in a letter for the sounds. O-E-U-VR-ES. You can't fail!! LOL! Enjoy and thanks for reading!!
Thursday, May 19, 2011
Kale and Chickpea Soup
Ugh, so I just got hit with bad allergies today. I mean I woke up with a stuffy nose, sneezed all day and all I wanted was a nice bowl of hot soup. I know it's getting really warm outside but this soup made me feel so much better!! I went to the grocery store and bought ingredients that were hearty, flavorful and packed with nutrients. Here's the recipe:

Kale and Chickpea Soup
Ingredients
3 carrots, peeled and diced
1 whole sweet onion, peeled and diced
3 stalks celery, diced
½ bunch fresh kale, washed, rinsed and chopped
1 can chickpeas, rinsed and drained
1 TBSP Vegetable oil
32 oz. chicken broth/stock**
2 cups water
Salt, pepper, cumin, nutmeg, dried oregano, dried thyme, red pepper flakes (TO TASTE)
1 TBSP. minced garlic
Shredded chicken, optional
Directions
1.)Wash and dry the celery, carrots and kale.
2.) Dice the celery, carrots, kale and onion.
3.) Add vegetable oil to a stock pot over medium heat. Add in the carrots, onion and celery to the stock pot. This mixture of vegetables is called a “Mirepoix” (Meer-uh-pwah)
4.) Saute these vegetables for about 10 minutes and then add in the kale. Mix the kale and mirepoix and put a lid on top. Saute until kale has reduced down to 1/3 the size you started with.
5.) After the kale has reduced down, open and rinse the can of chickpeas and add in. Saute for 1-2 minutes.
6.) Pour in an entire 32oz. box of chicken broth/stock followed by 2 cups of water.
7.) Add in the spices to your taste and simmer the soup for 15 minutes. I don’t like my vegetables to become mushy so I only let them cook for a little while. Add in the shredded chicken if you have some, just warm it through for a few minutes.
Eat immediately!! Makes great leftovers. Please enjoy and thank you for reading!!
***Cook’s Note: If your grocery store has it, buy the reduced sodium chicken broth/stock. If you have any sort of head cold or allergies, your taste buds may be off, so please do not go overboard with the salt.

Image pulled from http://blogs.courier-journal.com/recipes/tag/soups/ (I searched this on Google because I am still without a camera.)
Subscribe to:
Posts (Atom)